Swagger 整合到 Tio-Boot 中的指南
本文档介绍了如何将 Swagger 整合到 Tio-Boot 项目中。
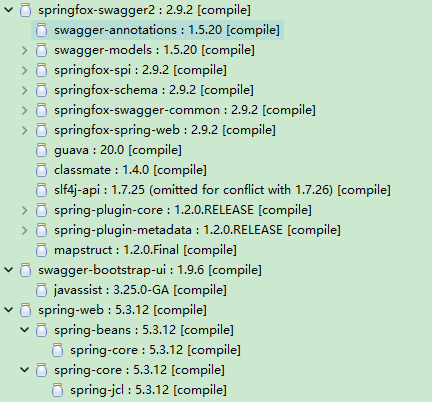
添加依赖
在 pom.xml 文件中添加以下依赖:
<dependencies>
    <dependency>
        <groupId>io.springfox</groupId>
        <artifactId>springfox-swagger2</artifactId>
        <version>2.9.2</version>
    </dependency>
    <dependency>
        <groupId>com.github.xiaoymin</groupId>
        <artifactId>swagger-bootstrap-ui</artifactId>
        <version>1.9.6</version>
    </dependency>
    <dependency>
        <groupId>org.springframework</groupId>
        <artifactId>spring-web</artifactId>
        <version>5.3.12</version>
    </dependency>
</dependencies>
注意:Swagger 会增加项目的打包体积,因此不推荐在生产环境中使用。
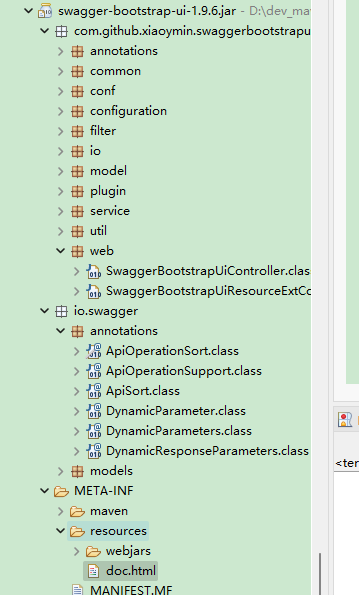
加载静态文件
swagger-bootstrap-ui 的静态资源位于以下目录:
添加配置
在项目中创建 SwaggerConfiguration 类进行 Swagger 的配置:
package com.litongjava.tio.web.hello.config;

import com.litongjava.annotation.ABean;
import com.litongjava.annotation.AConfiguration;
import com.litongjava.annotation.Initialization;
import com.litongjava.tio.boot.http.handler.common.WebjarHandler;
import com.litongjava.tio.boot.server.TioBootServer;
import com.litongjava.tio.http.server.router.HttpRequestRouter;
import com.litongjava.tio.web.hello.controller.SwaggerUiHandler;

import springfox.documentation.builders.ApiInfoBuilder;
import springfox.documentation.builders.PathSelectors;
import springfox.documentation.builders.RequestHandlerSelectors;
import springfox.documentation.service.ApiInfo;
import springfox.documentation.spi.DocumentationType;
import springfox.documentation.spring.web.plugins.Docket;

@AConfiguration
public class SwaggerConfiguration {

    @Initialization
    public void config() {
        TioBootServer server = TioBootServer.me();
        HttpRequestRouter requestRouter = server.getRequestRouter();
        if (requestRouter != null) {
            SwaggerUiHandler swaggerUiHandler = new SwaggerUiHandler();
            requestRouter.add("/doc.html", swaggerUiHandler::html);
            WebjarHandler webjarHandler = new WebjarHandler();
            requestRouter.add("/webjars/**", webjarHandler::index);
        }
    }

    @ABean
    public Docket createRestApi() {
        return new Docket(DocumentationType.SWAGGER_2)
                .enable(true)
                .apiInfo(apiInfo())
                .select()
                .apis(RequestHandlerSelectors.basePackage("com.litongjava.tio.web.hello.controller"))
                .paths(PathSelectors.any())
                .build();
    }

    private ApiInfo apiInfo() {
        return new ApiInfoBuilder()
                .title("APP API 文档")
                .description("APP 相关接口")
                .termsOfServiceUrl("http://ip:7001/")
                .contact("***@mail.com")
                .version("1.0")
                .build();
    }
}
添加示例 Controller
创建一个示例 Controller 来展示 Swagger 的使用:
package com.litongjava.tio.web.hello.controller;

import com.litongjava.annotation.GatewayCheck;
import com.litongjava.annotation.RequestPath;
import com.litongjava.model.body.RespBodyVo;

import io.swagger.annotations.Api;
import io.swagger.annotations.ApiImplicitParam;
import io.swagger.annotations.ApiImplicitParams;
import io.swagger.annotations.ApiOperation;
import io.swagger.annotations.ApiResponse;
import io.swagger.annotations.ApiResponses;

@Api(tags = "域名相关 API")
@RequestPath("/app/domain")
public class AppDomainController {

    /**
     * 获取指定域名 ID 的域名信息
     *
     * @return 响应体
     */
    @GatewayCheck(checkAdminToken = false, checkUserToken = false)
    @RequestPath("/selectLrbAppDomainById")
    @ApiOperation(value = "获取指定域名 ID 的域名信息", notes = "请求方式:GET;请求类型:application/x-www-form-urlencoded; charset=UTF-8")
    @ApiImplicitParams({
        @ApiImplicitParam(value = "平台管理员登录凭证", name = "token", paramType = "query", required = true, dataType = "string"),
        @ApiImplicitParam(value = "时间戳", name = "timestamp", paramType = "query", required = true, dataType = "string"),
        @ApiImplicitParam(value = "管理员令牌(前端携带管理员令牌,暂时通过接口文档中的申请令牌接口获取)", name = "AppDomainAdministratorToken", paramType = "query", required = true, dataType = "string"),
        @ApiImplicitParam(value = "域名 ID", name = "AppDomainId", paramType = "query", required = true, dataType = "string")
    })
    @ApiResponses({
        @ApiResponse(code = 200, message = "请求成功"),
        @ApiResponse(code = 0, message = "失败,返回失败说明"),
        @ApiResponse(code = 401, message = "无权限(通常是 token 不存在或无效)"),
        @ApiResponse(code = 403, message = "网关校验失败"),
        @ApiResponse(code = 405, message = "管理员令牌校验失败(前端将跳转至友好的 404 页面)")
    })
    public RespBodyVo selectLrbAppDomainById() {
        return RespBodyVo.ok();
    }
}
分析 Spring-Boot 整合 Swagger 后的请求和响应
Swagger UI 配置
访问以下 URL 获取 Swagger UI 的配置:
http://127.0.0.1:8080/swagger-resources/configuration/ui
响应示例:
{
  "deepLinking": true,
  "displayOperationId": false,
  "defaultModelsExpandDepth": 1,
  "defaultModelExpandDepth": 1,
  "defaultModelRendering": "example",
  "displayRequestDuration": false,
  "docExpansion": "none",
  "filter": false,
  "operationsSorter": "alpha",
  "showExtensions": false,
  "tagsSorter": "alpha",
  "validatorUrl": "",
  "apisSorter": "alpha",
  "jsonEditor": false,
  "showRequestHeaders": false,
  "supportedSubmitMethods": ["get", "put", "post", "delete", "options", "head", "patch", "trace"]
}
Swagger 资源
访问以下 URL 获取 Swagger 资源信息:
http://127.0.0.1:8080/swagger-resources
响应示例:
[
  {
    "name": "default",
    "url": "/v2/api-docs",
    "swaggerVersion": "2.0",
    "location": "/v2/api-docs"
  }
]
Swagger API 文档
访问以下 URL 获取 Swagger API 文档:
http://127.0.0.1:8080/v2/api-docs
响应示例:
{
  "swagger": "2.0",
  "info": {
    "description": "APP 相关接口",
    "version": "1.0",
    "title": "APP API文档",
    "termsOfService": "http://ip:7006/",
    "contact": {
      "name": "***@mail.com"
    }
  },
  "host": "127.0.0.1:8080",
  "basePath": "/",
  "tags": [
    {
      "name": "域名相关API",
      "description": "App Domain Controller"
    }
  ],
  "paths": {
    "/app/domain/selectLrbAppDomainById": {
      "post": {
        "tags": ["域名相关API"],
        "summary": "获取指定域名ID的域名信息",
        "description": "请求方式GET,请求类型:application/x-www-form-urlencoded; charset=UTF-8",
        "operationId": "selectLrbAppDomainByIdUsingPOST",
        "consumes": ["application/json"],
        "produces": ["*/*"],
        "parameters": [
          {
            "in": "varchar",
            "name": "AppDomainId",
            "description": "域名ID",
            "required": true,
            "schema": {
              "type": "string"
            }
          },
          {
            "in": "varchar",
            "name": "AppDomainministratorToken",
            "description": "管理员令牌(前端heAppDomainer携带管理员令牌,暂时通过接口文档里面的申请令牌接口获取!)",
            "required": true,
            "schema": {
              "type": "string"
            }
          },
          {
            "in": "varchar",
            "name": "timestamp",
            "description": "时间戳",
            "required": true,
            "schema": {
              "type": "string"
            }
          },
          {
            "in": "varchar",
            "name": "token",
            "description": "平台管理员登录凭证",
            "required": true,
            "schema": {
              "type": "string"
            }
          }
        ],
        "responses": {
          "0": {
            "description": "失败,会返回data,此参数为失败说明"
          },
          "200": {
            "description": "请求成功",
            "schema": {
              "$ref": "#/definitions/RespBodyVo"
            }
          },
          "201": {
            "description": "Created"
          },
          "401": {
            "description": "无权限(通常是token不存在或无效)"
          },
          "403": {
            "description": "网关校验失败!"
          },
          "404": {
            "description": "Not Found"
          },
          "405": {
            "description": "管理员令牌校验失败(前端直接跳转一个友好的404页面)!"
          }
        },
        "deprecated": false,
        "x-order": "2147483647"
      }
    }
  },
  "definitions": {
    "RespBodyVo": {
      "type": "object",
      "properties": {
        "code": {
          "type": "integer",
          "format": "int32"
        },
        "data": {
          "type": "object"
        },
        "msg": {
          "type": "string"
        },
        "ok": {
          "type": "boolean"
        }
      },
      "title": "RespBodyVo"
    }
  }
}
总结
通过以上步骤,您已成功将 Swagger 整合到 Tio-Boot 项目中。Swagger 不仅可以帮助您生成 API 文档,还能通过 Swagger UI 提供直观的接口测试平台。请注意,在生产环境中使用 Swagger 可能会增加项目的打包体积,建议在开发和测试环境中使用。